

Well, I did it. I went camping. Like, slept-in-a-tent-outside-in-the-woods camping. I might have done that once when I was 8 or so at camp, but never as an adult. Friends have mentioned or invited me camping before, but when you’ve never done it, it sounds so daunting and scary. So, this is for all those people who are thinking about it, in excruciating detail, so that you can be super chill and say yes to your experienced camping friends. Embedded with tales of my trip, sit back and relax.
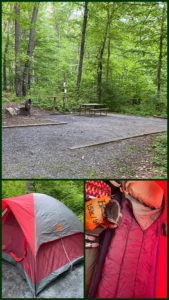
Below is a picture of the camp site, along with our tent and my side inside (showing the air mattress topped with a sleeping bag).
Firstly, I did a ton of research to mentally prepare myself, and also to help with packing. Do your research on the area, the weather, different tools and hacks that can make your life easier, etc. Here are some YouTube videos/channels that were super helpful, that I wanted to shout out (this is an unsponsored post):
YouTube Channel: AmandaOutside
Camping for Beginners: https://www.youtube.com/watch?v=BSJreMMUEbM
DollarTree Camping Hacks: https://www.youtube.com/watch?v=GrQZcI6NaU0
Complete Camping Checklist: https://www.youtube.com/watch?v=4bD1MswEzGI
I should add, that this blog post is not for the rugged minimalist. This is a bit of glamping, or “Comfort Camping,” as some videos have called it.
For reference, I stayed at a State Park Campsite on the East Coast of the United States with shared restroom facilities in late May 2021. Temperatures were approximately 60F in the day and 45F at night. Each gravel-paved camp-site was provided with a picnic table and fire ring. I camped with friends, so if you are traveling alone, you should read up on extra safety precautions you may want to take.
Let’s talk in 6 main categories: Comfort, Personal Items, Food, Camp Fire, Entertainment, and First Aid. At the end I’ll provide a list of things you should bring.
First things first, it’s important to get organized. Where are you going? For how many days? What amenities are available? You have to be careful looking at the weather too far ahead, but if you have a ballpark number, you can semi-plan your layering. It’s also good to know your body. I get cold at 60 degrees F, while I’m perfectly content at 71. I sleep cold. Paying attention to this will help you plan what you are going to need to go to sleep, especially when temperatures dip below 50F.
COMFORT
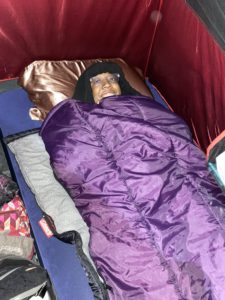
Figure out your sleeping system. For me, I was sharing a “4-person” tent (the quotes are purely sarcasm, because I don’t see how 4 adults could comfortably fit in there) with one person. I would recommend having a tarp or some type of water resistant blanket underneath the entrance (at least) of your tent. If you have a gravel site (as I did), it helps with keeping that out of your tent, and just keeping the inside cleaner. Inside the tent I put foam mats down on the tent floor, then the air mattress (that was comical carrying from the bathroom, since that was the only place with an electrical outlet), then my sleeping bag. I initially had a super high mattress, but a friend point out that the more air inside the air mattress, the colder I would be (air assumes the temperature of it’s environment), so I was glad to “downgrade” to a normal height twin air mattress. I was very worried about being cold, as most nights it was supposed to be 50F. So, after watching plenty of videos and comparing reviews, I purchased the Sea to Summit Premium Fleece Sleeping Bag Liner, which is supposed to add 10-15 degrees of warmth. I also purchased a polyester base layer (long sleep top and bottom) as my main pajama. Cotton will absorb your sweat and that could get cooled by the cold air and actually make you colder.
Side Note: I want to take a minute and shout out Coleman products!!! We had a downpour and this seemingly thin-walled tent kept us dry (Thank God for polymers!!). I definitely had my doubts, but it was so well designed. Slow. Clap. All. Day!!! Great product!!
TIP: NEVER take your sleeping clothes (including clean wool socks) out of the tent.
You want to have a unique pajama outfit that stays in the tent and remains dry. If they get wet, you will be uncomfortable the rest of the trip. We always assume we can dry things in the sunlight, but if you get back to back days of rain (like I did), that is a moot point. So, I had a pair of wool socks that I wore just with my pajamas, and unless I really had to use the restroom and it was super dry outside, those clothes stayed inside the tent, and I would change before leaving the tent.
Your clothing and belongings stay in the tent with you; for that reason, you want to have 1 large duffel bag at most, so you know where everything is. I also like the idea of having 1 grab bag with your toiletries inside the duffel, so you can grab it in the morning end night to go brush your teeth, wash your face, etc. We also brought a collapsible “box” that we kept near our bed for easy access – cell phone, battery charger, headlamp, tissue, book, flashlight, etc. It’s a bit of a chore to fully go into the tent each time you want something, and if you are going during a Cicada rampage (as did I), then you have to zip behind you every second, or risk getting bugs inside the tent (the most uncomfortable experience).
This would not be glamping if we didn’t add some unnecessary, but cute, flare. String lights, are helpful and also make you feel more relaxed. They are easy to hang and often have a battery pack. I also love the dollar store solar lights you dig into the dirt. They really help get you oriented if you have to jump out of the tent in the middle of the night, or just to help get back to your tent from a late night walk to the restrooms. Before you roll your eyes, if you live in the city, you may not really know darkness. There’s always a street light somewhere providing some light. But this is the woods. We’re talking, no street lights, no reflected moon light, weird noises in the bushes kinda darkness. So, it’s best to be prepared. Purchase a table cloth and some large clamps (in case it’s windy) at a dollar store. Adds some nice ambience, and keeps your area nice and sanitary. Also bring some music speakers. All these little extras make “roughing it” feel so much more homey.
I’m going to take a moment here to talk about a very important topic: the pillow. We take our pillow for granted. Once you find the perfect pillow, you forget about it. You go to sleep every night and you don’t wake up thinking about your pillow. You think about the bed, the sheets, your pajamas, and then all the things you have to do. So it’s very easy to neglect this minor detail. I purchased a camp pillow at a sporting goods store and I am so happy I tested it out one night. It’s just not the same. It’s tiny, barely supportive, and laughable (still debating if I want to return it – I hate returning things; such a hassle). I digress. So yes, the pillow is so important and it adds a level of comfort that can not be beat. All this to say – bring your own large pillow form home. This is the difference between roughing it and camping with style – you get to have these small luxuries.
PERSONAL ITEMS
These are your clothes and toiletries. It’s good to have a pair of sturdy hiking shoes, long wool socks, athletic pants that can reach your ankle (Pull the socks over), layers for your torso (tank top, t-shirt, long sleeve t-shirt, lightweight hoodie, rain resistant jacket with hood, heavy night-time hoodie, etc). I would plan one new outfit per day. You can reuse layers, but be mindful in case something gets wet and doesn’t dry in time.

There are bugs in the bathroom. Yes, get the screams out of your system. We are, in fact, in their territory. Between crawly insects and germs from public areas, I do not like my belongings touching the floor, especially a public restroom, so hooks are your friend. Buy a toiletries bag with hooks, bring S hooks, do what you have to do, but remember that there’s not a lot of space to hang things. I was pleasantly surprised that the shower area had a seat outside the shower for changing, which was a nice place to put my dry clothes, but be prepared if you don’t have that. Drawstring bags are also an easy thing to carry that doesn’t take up a lot of space. When walking to and from the bathroom with your toiletry bag, you might want to leave your hands free for your flashlight, or just in case you trip, so putting it into a drawstring bag is extra helpful.
For women: It’s always a good idea to bring what you might need in case you start your period. It may seem like extra, but better to be prepared. There are lots of YouTube videos for alternatives to disposable items, but just be ready.
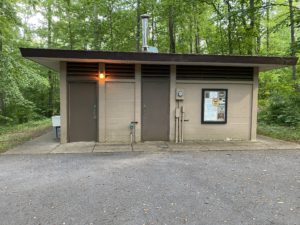
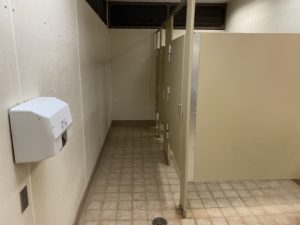
 Here’s a glimpse of the restroom facilities. There was a shared bath house, not too far from our site with a men’s and women’s restroom. Outside the restroom was a sink for washing dishes. Inside the restroom you had the stalls and then showering facilities. Each shower had its own stall with room to change and a shelf to put your clothing on. The sinks are not pictured, but plenty of space to brush you teeth and take care of your morning and night time routines.
If you are a regular reader, you know how much I love packing cubes (See my trip to Europe post here)!! Packing cubes make it super easy to find what you need by packing in categories and then placing those cubes back in the bag. I had packing cubes for: undergarments, pajamas, hoodie, and athletic wear.
One thing I didn’t think I would use, but actually ended up using quite a bit was my umbrella. I figured that with all the layers and the rain jacket, I wouldn’t need it, but it was super helpful having a small umbrella in my hiking backpack for when I rained to keep me dry walking between the car and a stop or walking to the restroom from the tent.
Bring a designated bag for wet clothes. At some point in our trip we knew that one shirt we planned on rewearing was not going to dry, so it would have been nice to have somewhere to store wet things, out of the way, without getting the other clothes wet. I dried some things out as much as I could, and in the end just threw it in my duffel on my way home. Trash bags just don’t do the trick. I have never tried a micro fiber towel, but I hear those dry super fast, so that might be an interesting add.
TIP: To help with staying warm, wear a beanie at night. It will keep your body heat from leaving your body. (Shoutout to my coworker, for that tip ?)
FOOD
For my first camping trip, I didn’t want to worry about raw meat and the concerns of food prep and bacteria and all that, so everything I brought with me was pre-cooked. I kept it simple with turkey hot dogs, but my travel mates had some cool things. Lots of videos on foil packet meals and things; really depends on your diet and what you like to eat. I do recommend bringing high protein items, such as peanut butter and nuts, something sweet, something salty, something fruity, and plan for 3 meals a day and maybe 2 snacks, plus some extras to share.
Now, food does not go in the tent. Dead serious. In the event of bears or animals, you want to try to smell as least like food as possible. We kept cold stuff in the coolers in the car trunk and non-perishables in totes in the car as well.
Tip: Lysol wipes are good for wiping down surfaces, and baby wipes are good for wiping your hands after having sticky s’mores.
We got some cheap trash bags at the dollar store to hold any trash for the day. Every time you leave the camp site you want to make sure your food is put away and scraps are thrown into the dumpster. The dumpers is bear proof, so requires a little effort to open.
Tip: don’t forget to empty your hiking backpack from any snacks before going to bed.
CAMPFIRE
Bring cash for wood. This sounds funny, especially if you have wood at home, but several states do not allow you to bring wood from outside, as you could have bugs in the wood and that could lead to an infestation they weren’t counting on. Fires are actually harder to start than they look. A fire starter is a good idea. We used duraflame. Buy these before your trip. They are super cheap. Once you get to the woods everyone wants to sell you a bushel of starters that you don’t need. They are usually around $2 each; You should have at least one for each fire you want to light, and then add an extra. So if you want coffee in the morning, you’ll probably need to start a fire.
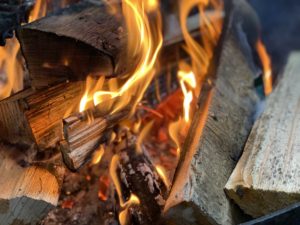
A good camp chair is a must; you’ll need this for talking around the campfire, roasting marshmallows, and just enjoying the fresh air. Some type of camp table is nice, whether it’s attached to the chair or not, and you definitely want at least one cup holder in the arm rest. I assembled one of those water bottle sized chairs and to be honest, it wasn’t comfortable. I’m sure if you are backpacking and you have to be mindful of size and weight, that’s a great alternative, but for the normal camper, go with a regular sized foldable camping chair.
ENTERTAINMENT
Sometimes it’s rainy and cold and you don’t feel like hiking or it’s too dark or you are sleepy but you have to wait for the fire to die out all the way. So it’s fun playing a game. Small compact, card-style games are great. You can use your LED lanterns to light the area. We had one hanging with an S-hook at the top of the pop up tent that was over the picnic table; and a couple on the table itself.
FIRST AID
You never know what can happen, so better to be prepared. Just have enough to stop the bleeding/infection, until you can get medical help.
So, there you have it. If this is your first time, I would definitely ease into it and start with a campsite that doesn’t have too many bear sitings. The main thing to remember is to be flexible and have fun. Plan activities like hiking and seeing the neighboring areas. Meet people that are traveling from all over the world. Enjoy nature and identifying the different flowers and bird chirps. The more time you spend outside in the evening, the more your body will get acclimated to the temperature. There was one point where we were all perfectly warm at 46F, which I’m sure helped to make sleeping more bearable.
(Shout out to my friend Cat for getting me started with a list of items)
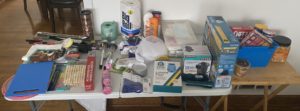
PACKING LIST
| Comfort | Personal | Food | Camp Fire | Entertainment | First Aid |
| Sleeping Bag | Bug Spray | Cooler | Paper Towels | Cards | Peroxide |
| Sleeping Bag Liner | Sunscreen | Ziploc Bags | Plates/Bowls | Games | Alcohol |
| Air Mattress/ Pump | Clothesline | Peanut Butter | Utensils | Book | Tylenol |
| LED Lantern | Toilet Paper (1 roll) | Bread | Aluminum Foil | Music Speaker | Aspiring |
| Headlamp | Toothbrush/paste | Snacks | Wet Wipes | Itch Cream | |
| Flashlight | Wool Socks | Water | Tongs | Tweezers | |
| Duct Tape | Feminine Products | Salt/Pepper | Skewers with a long arm | BandAids | |
| Solar Battery Charger | Beanie/Cap | 3 meals/day | Matches | Gauze | |
| Camping Chair | Sunglasses | Fire Starters | Hand Sanitizer | ||
| Pillow | Backpack | Table Cloth & Clamps | Gloves | ||
| Laundry/Wet Bag | Hiking Shoes | Garbage Bags | Bandage | ||
| Extension Cord | Flip Flops | Bug Repellent Candles | |||
| String Lights | Pajamas | Scissors/Knife | |||
| Batteries | Activewear | Cutting knife | |||
| Binoculars | T-shirts | Cutting Board | |||
| Touch Light | Undergarments | ||||
| Tarps | Sweartshirts | ||||
| Bungee Cords | Rain Jacket/Poncho | ||||
| Mallet | Umbrella | ||||
| Rope | Towel | ||||
| S Hooks | Shower Cap | ||||
| Head Scarf | |||||
| Chargers/cords |
Glamping is better than being a couch potato. Well done and I hope you are able to do it again.